What if I told you there was a way to get real-time visualization of airflow over your model for the entire duration of your test, and collect force and moment data at the same time? And all it took was $10 and a trip to the local craft store?
That method is called tufts, or tufting, and it’s probably the type of flow vis with the highest return on investment.
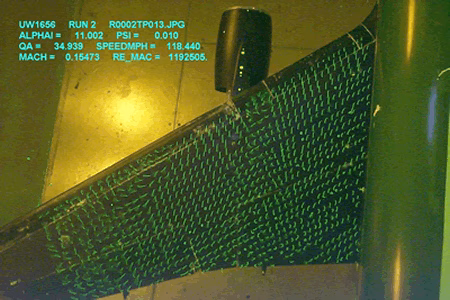
You attach short pieces of yarn or string to a long strip of tape, making sure the yarn pieces are relatively equal lengths and regularly spaced. You then tape this strip of tufts to your model’s surface wherever you want to visualize the airflow.
You can vary factors based on what you need: tuft length and material, density of tufts per strip, how much of the model is covered in tufts, and so on.
If you want to be really fancy, you can glue thin fluorescent filaments to your model’s surface. Under specific lighting conditions the tuft matrix will glow and provide vivid evidence of what’s going on aerodynamically.
And if you use the right kind of tape, these will stay on for practically your entire test entry. It’s also straightforward to rig up cameras that will automatically take a photo at every data point, allowing for the progression of airflow patterns to be documented.
So what are the drawbacks?
Making tufts is somewhat fiddly—after all, you’re putting little bits of yarn or string on tape. And some will get destroyed by the wind, so you’ll need to replace them every so often.
Like smoke flow, they also don’t preserve the flow behavior for a given condition. You’ll need to take photos with the wind on if you want to study a specific case in detail.
And sometimes the tufts are hard to “read” because they’ll wiggle as the flow gets more turbulent. In most photos you’ll just have little fuzzy streaks to show where the air is flowing.
But honestly…considering tufts are very set-and-forget, easy to make, and cheap, I’d highly recommend using them if you just want some general flow visualization. They’re by no means necessary, but still a good technique to keep in your arsenal.
Plus, doing a little bit of arts and crafts on the job is always satisfying.
I started yesterday’s email asking if flow vis was actually useful. At this point that probably seems like a weird question.
What I want you to think about a little is the amount of time and effort most of these techniques take. China clay can take a couple of hours, smoke flow longer. That’s hours when you could be collecting balance data to refine your CFD, inform your simulations, make critical design choices.
I see flow vis as a slippery slope if you don’t know why you’re doing it. You may spend a few hours on it because you think it’s what “real engineers” do. Or someone in leadership asked if you were doing it, and wanted pretty pictures for marketing, and now you feel under pressure.
If getting visuals of flow over and around your model will genuinely inform decisions, then awesome. Take the time to get some nice photos. Investigate the weird behavior you didn’t expect.
Just be mindful. Make sure the time you spend on flow vis contributes to the goals of your test, instead of burning both money and hours.