The phrase “test matrix” might sound intimidating. But honestly, it’s way more low-tech than it sounds.
It’s simply a spreadsheet that details the configurations you’re going to test, alongside the airspeed and angles you want.
During any test, you’re paying for every hour of scheduled wind tunnel occupancy time, whether or not the tunnel is operating. To avoid wasting your precious time and money, it’s critical to construct a game plan for your test.
Before you step foot into the wind tunnel facility for your test entry, you should have at least a high-level draft of your matrix. What your high-level draft defines should roughly map to your test objectives (you do have those, right?).
A test is broken down into a series of nested changes. For any chunk of testing, you’ll have a single configuration. This is the combination of model pieces and control surfaces you have assembled: for example, your aircraft’s flaps set to 40° of deflection, with the elevators at 5°.
You’ll then do a series of sweeps, with each sweep being placed in its own “run,” or file of data points. Most often, you’ll sweep through angles of attack while holding your tunnel speed constant. For a propulsion test, each run may be a sweep of power settings at a constant angle of attack and speed.
A chunk of runs is referred to as a “run block.” I like to lay out my high-level test matrix in terms of run blocks—defining what configuration will be used, what tunnel speed, and what angle of attack sweep, but not getting into the nitty-gritty of each run.
Here’s an example of what a chunk of run matrix could look like, using the case above:
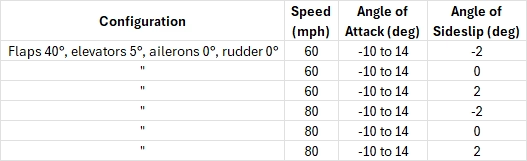
See how it starts to look like how you’d lay out any other scientific experiment? One variable is changed at a time, in sequence, and data is collected to see how that change influenced the results.
At this point, you’d probably change something else about the configuration, like setting elevators to 10°. You’d repeat this block and then go to the next change.
If it sounds boring as hell, that’s because it is. We like it that way. A test only gets exciting if you’re doing flow visualization, if you’re trying something brand new, or if something has gone wrong.
Your functional run matrix will be more detailed than this, because it needs to clearly dictate and record every variable of every run. It’ll often include a column for each of the following:
- Run numbers for each run
- Configuration notes, to easily identify a block (“FLAPS 40 + ELEVATORS 5”)
- The angle of attack or sideslip sweep to use
- The constant sideslip angle or angle of attack, where applicable
- Tunnel speed
- Columns for each of the variable parts of the model, like flaps or ailerons
- Time estimates for each run block, to help with scheduling and prioritizing
Recording all this information is important not just for executing the test, but also for processing the data afterwards. Referencing the matrix lets you see exactly which runs’ data to compare for whatever question you’re answering.
For how simple it may seem, the test matrix is one of your most important pieces of documentation.
This email concludes this series on wind tunnels and testing, though there’s still so much more we could cover. If you’ve stuck around for the whole thing, I appreciate you! No matter how much you’ve read, I hope you learned something useful or interesting.
Reply back if you have questions on any of the topics I’ve talked about. And don’t hesitate to reach out if you could use some guidance for your own testing—this stuff is not intuitive, and not many people get the chance to learn about it. I’d love to help you plan a great test.