This might be old news if you spend any time in aviation/aero industry circles on LinkedIn. But I thought it was way too awesome to not highlight.
I’ve talked about it here before, but XFOIL is more or less the gold standard software for airfoil analysis. It’s free and relatively simple to get started with (plus has thorough documentation), but is plenty powerful for almost anything you can think to throw at it. It’s good for basic airfoil thickness studies, all the way up to revealing where your control surfaces might be losing authority.
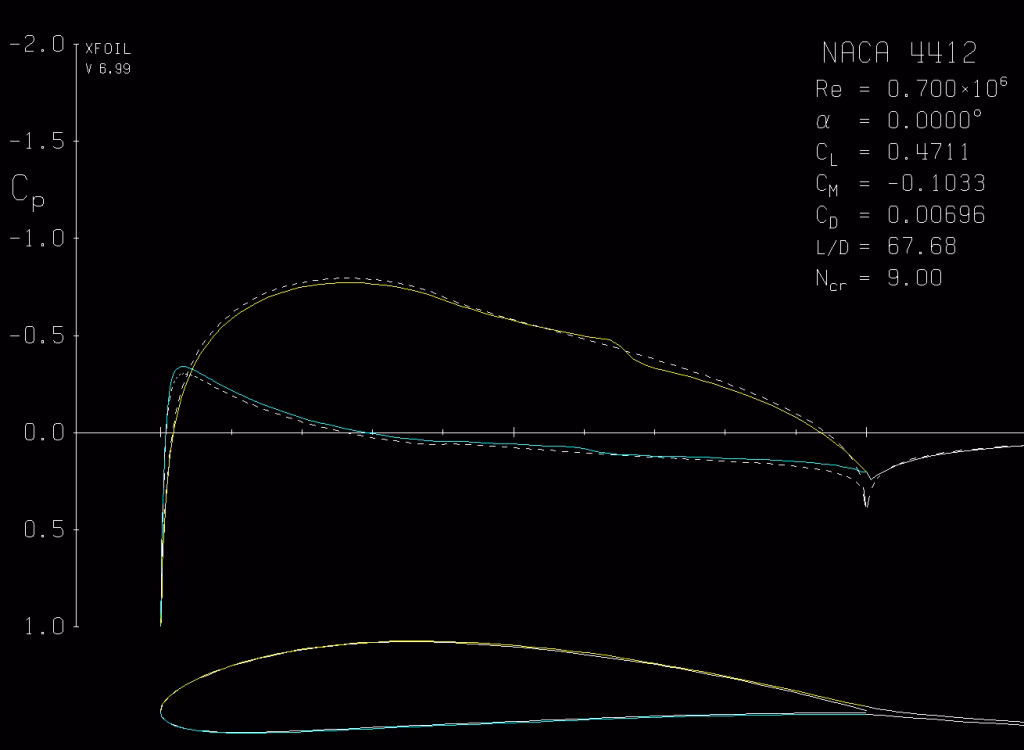
The only bummer is the application itself: it was first developed in the 1980s, making it easily 40 years old, and the source code is written in Fortran. It’s operated via the command line, using short instructions like GDES and OPER to switch between different settings and run the actual analysis. And the flow visualization is helpful, but minimal, with lines showing the shed wake of the airfoil as well as the pressure coefficients across the upper and lower surface.
None of this is meant to disparage the tool—its creator, Mark Drela, gave every aerospace engineer an incredible gift by making XFOIL, and making it available entirely for free. XFOIL is just showing its age a little, is all (and apparently does not play nice with Mac computers).
But last week, Harry Smith at Flexcompute released a free browser-based version of XFOIL called Flexcompute Foil (which nicely shortens to FlexFoil). This isn’t a look-alike, it’s the source code itself translated and re-implemented with a friendly user interface and more flow visualization options. The future is now!
All the same functionality of the original XFOIL is here, just with a modern user interface and some updates for ease of use. Data is plotted as it is generated and you can compare multiple sweeps in the same graphics window. XFOIL provides this to an extent, but I find it easier to export my data to a text file and plot it in a different program like MATLAB. And XFOIL doesn’t show the data plots while you’re running the actual analysis, while FlexFoil does.
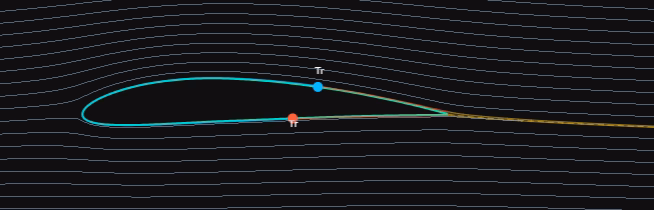
I really like the visual updates. XFOIL has always provided the transition location of the upper and lower surfaces (where the airflow goes from laminar to turbulent) but FlexFoil uses dots to mark those locations. You can see how that trip point moves around with angle of attack, Reynolds number, and the airfoil geometry itself.
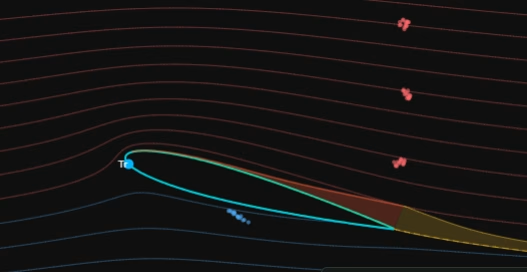
Speaking of visual updates—there are more flow vis options, too! Streamlines provide a static snapshot of the airflow, and there’s even an option for animated smoke so you can see how particles would move around the airfoil. Depending on the settings you can see some of the particles slow down significantly as they encounter the boundary later which really is just plain neat.
Updating geometry also feels more user-friendly, both because of how much more intuitive the user interface is and because of the immediate graphical updates. You can adjust thickness and camber using sliders (the equivalent of XFOIL’s TFAC and TSET functions) or change the control points individually. Adding a flap is similarly straightforward, also done with sliders and with the changes reflected in real time. I like that you can immediately see the effect changes have on a specific case without re-running the entire polar first. I’m a very visual person and this helps me better understand what’s going on physically.
What I already really love about FlexFoil is how much easier it makes it to get started with the fundamentals of aerodynamic analysis. You don’t need to commit the XFOIL options to memory and type them repeatedly into a command line window to complete your analysis. The options are provided in plain English, making it clear what your solver settings are before you run an analysis. Your geometry adjusts instantly, and you can see your data plotted as it’s generated.
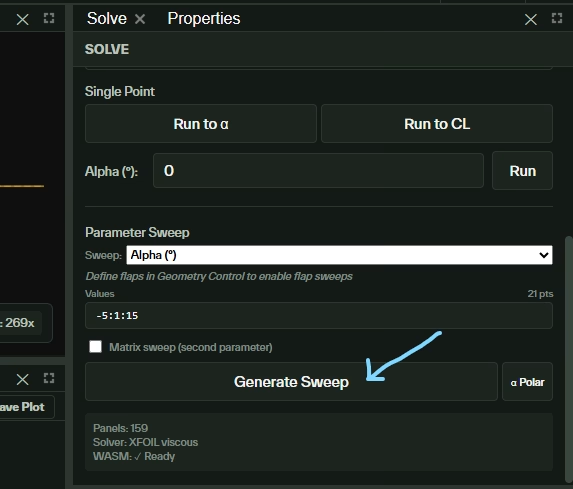
I would argue that this makes aerodynamics more accessible even to people who don’t have strong physics backgrounds. There are enough parameters pre-set that, upon loading the application, you can immediately click “Generate Sweep” within the Solve panel and get some aero data. You can increase the airfoil’s thickness or add a flap and see the change reflected in the results. Because all of the options are clearly presented and the geometry updates immediately, it feels more natural to play around with all the different knobs and discover their effects for yourself.
If you’re curious about how and why Flexcompute decided to adapt a free analysis tool, this article by Harry Smith provides an excellent overview, and a link to an even more in-depth article about the coding and validation that went into this effort.
And even if you aren’t an aero engineer, I’d still highly recommend checking out FlexFoil for yourself and exploring it a bit. Even just turning on the smoke flow in the Visualization panel is a fun little “gee, whiz!” that makes the click worth it.